Follow Me On Social Media!

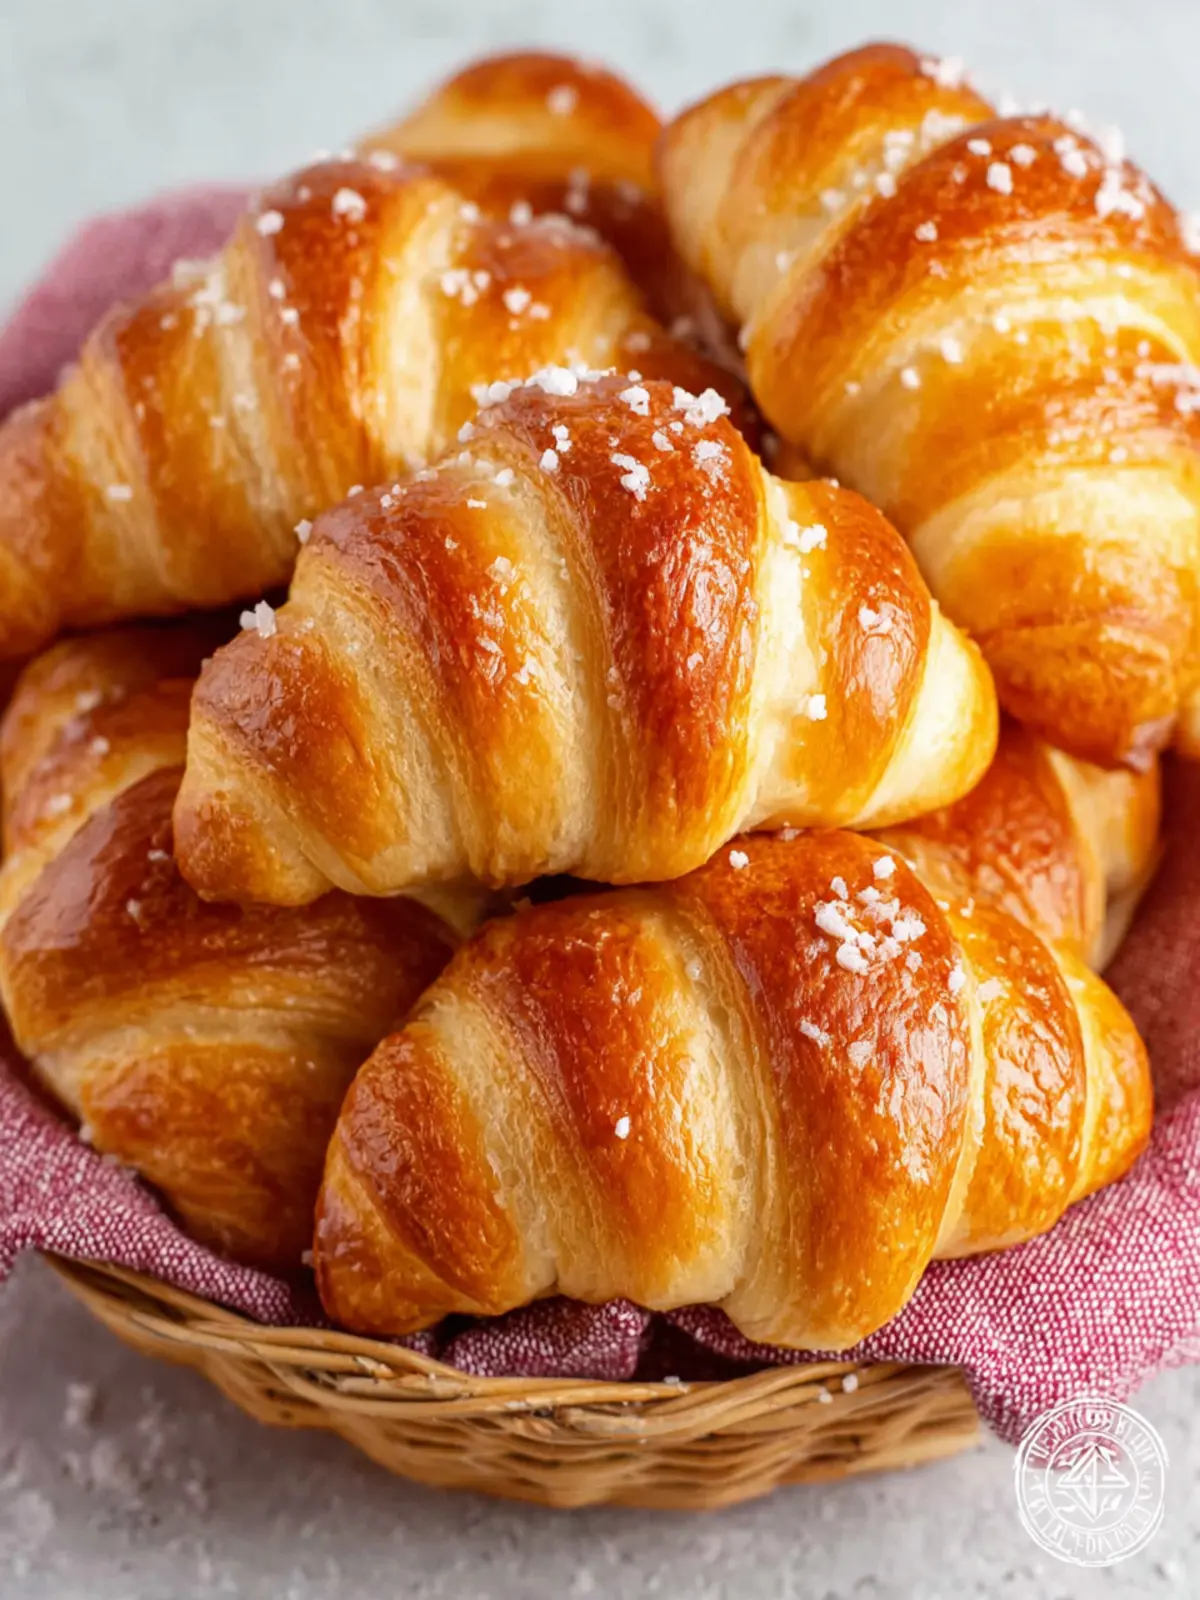
Homemade Crescent Rolls: The Best Flaky Treat You’ll Crave
Introduction to Homemade Crescent Rolls
The aroma of homemade crescent rolls baking in your kitchen can transport you back to your childhood, igniting memories of cozy family dinners and warm gatherings. There’s something undeniably comforting about those flaky, golden-brown beauties that beckon you to enjoy them straight from the oven. Imagine pulling apart a warm roll, letting the steam rise up, and savoring its buttery layers; it’s a moment that speaks to the joy of cooking and sharing food.
The magic of freshly baked crescent rolls
Why are homemade crescent rolls so special? For starters, the ingredients you choose play a pivotal role. Each component contributes to the delightful experience, from the rich butter that creates layers to the flour that gives the rolls their structure. And let’s not forget the process—making crescent rolls is a delightful combination of art and science, requiring attention, patience, and a sprinkle of love.
If you’re thinking of venturing into the world of baking, making crescent rolls at home can be a fantastic starting point. You’ll find that the act of kneading dough, letting it rise, and shaping those delightful triangles into their final form brings a sense of accomplishment that store-bought rolls simply can’t match. Not to mention, your friends and family will be in for a treat when they experience the melt-in-your-mouth texture and rich flavor of fresh rolls.
Typically, many of us reach for pre-packaged options at the grocery store, but often, they just don’t compare to the joy of baking from scratch. The best part about homemade crescent rolls is that you have the freedom to customize them to your liking. Want to add herbs or cheese? Go for it! Interested in filling them with fruit preserves or chocolate? Why not?
So, roll up your sleeves and prepare to embark on a culinary adventure that will not only satisfy your hunger but also your creativity. With every bite of your homemade crescent rolls, you’ll discover the magic that comes from baking right in your own kitchen.

Key Ingredients for Homemade Crescent Rolls
Creating homemade crescent rolls is a delightful culinary adventure filled with warmth and the promise of comforting aromas wafting through your kitchen. Each ingredient plays a vital role in the final result, ensuring every bite is as heavenly as you imagine.
Instant yeast: Essential for that fluffy rise, instant yeast speeds up the dough-making process and helps create light, airy rolls. No need for proofing; simply add it to your dry ingredients and let the magic happen.
Warm milk: A crucial ingredient that activates the yeast, I always ensure my milk is at just the right temperature, around 110-115°F. Too hot, and you’ll kill the yeast; too cold, and it won’t activate. This step is key for achieving fluffy rolls.
Sugar: A touch of granulated sugar provides the yeast with a necessary food source and adds a hint of sweetness to the rolls. It creates a beautifully balanced flavor without overwhelming the palate.
All-purpose flour: The backbone of our dough, all-purpose flour gives the rolls structure and a delightful texture. I prefer to sift it for a lighter result, making the rolls even fluffier.
Table salt: A simple yet essential ingredient, salt enhances flavor and controls the fermentation process of the dough. Just the right amount ensures the rolls taste perfectly balanced.
Egg: Eggs add richness to the dough, while also helping with structure and moisture. They play an important role in creating that tender crumb we all love.
Unsalted butter: Softened butter brings flavor and a tender crumb to the rolls, ensuring each bite is luxurious. The butter also helps achieve that golden edge as they bake.
Egg wash: Brushing the rolls with a beaten egg before baking gives them that lovely golden finish. This simple step elevates your homemade crescent rolls to bakery-level perfection.
Why You’ll Love These Homemade Crescent Rolls
When the tantalizing aroma of homemade crescent rolls fills the kitchen, it creates a heartwarming atmosphere that instantly brings family and friends together. Imagine gathering around the dinner table, butter melting into warm, flaky layers, creating those unforgettable moments that linger long after the last bite. Making your own crescent rolls is not just a cooking task—it’s an experience that transforms any meal into a special occasion.
What makes these rolls so delightful? Here are a few reasons:
-
Texture: The soft and buttery layers are perfect for sopping up sauces or basking in your favorite spreads. Every bite is an indulgent treat.
-
Versatility: Whether you’re serving them at brunch, dinner, or as a snack, these rolls adapt beautifully. You can even stuff them with sweet or savory fillings for a fun twist!
-
Satisfaction: There’s nothing quite like biting into something you’ve created from scratch. It’s not just about the taste; it’s the entire process that brings joy.
-
Easy to Make: Even for beginners, this recipe is straightforward and fun! You’ll impress your loved ones without spending hours in the kitchen.
Making homemade crescent rolls truly brings a sense of warmth and togetherness that store-bought simply can’t match. So why not give it a try? Your taste buds—and your family—will thank you!
Variations of Homemade Crescent Rolls
Exploring the different variations of homemade crescent rolls opens a world of flavors and textures, transforming a simple recipe into endless possibilities that are sure to impress your family and friends.
Herb-infused Crescent Rolls
Imagine warm, fluffy crescent rolls scented with fresh herbs! By incorporating finely chopped rosemary, thyme, or oregano into the dough, you elevate these rolls to new heights. Not only do they pair wonderfully with soups and salads, but they also make a delightful addition to any holiday table. Just be sure to sprinkle a little extra salt to enhance those herbaceous flavors!
Sweet Crescent Rolls with Cinnamon
When I think of cozy mornings, sweet crescent rolls with cinnamon always come to mind. For this delicious twist, roll out your dough and generously sprinkle a mixture of brown sugar and cinnamon before shaping them into crescent form. The result? A sweet, sticky filling that complements the flaky exterior perfectly. Drizzled with a simple icing or dusted with powdered sugar, these rolls will be a hit with anyone who has a sweet tooth.
Cheese-stuffed Crescent Rolls
For a savory snack that’s hard to resist, try making cheese-stuffed crescent rolls. Simply place a small piece of your favorite cheese—like mozzarella, cheddar, or even cream cheese—inside each roll before baking. The melted cheese creates an irresistible gooey center, making these rolls the ultimate comfort food. Pair them with a marinara dip for an appetizer that disappears before you know it!
Cooking Tips and Notes for Homemade Crescent Rolls
Kneading techniques for perfect dough
To achieve beautifully flaky homemade crescent rolls, kneading is essential. Start by mixing your ingredients until they just come together. Then, lightly flour your work surface and knead for about 5-7 minutes. The goal is to develop gluten without overworking the dough. You can tell it’s ready when it’s smooth and elastic. If you have a stand mixer, feel free to use the dough hook for a more hands-off approach.
The importance of letting the dough rise
Patience is key when making homemade crescent rolls. After kneading, let the dough rise until it has doubled in size—this usually takes about 1 to 2 hours, depending on your kitchen’s temperature. A warm, draft-free area is ideal for this step. Allowing the dough to rise properly ensures your rolls will have a light, airy texture.
How to avoid common baking pitfalls
When rolling out your dough, avoid the temptation to use too much flour as this can make the rolls dense. It’s better to have sticky dough than one that’s too dry. Also, be cautious not to overbake your rolls; they should be golden brown but not dark. If you’re unsure, take them out a few minutes early, as they will continue cooking slightly once removed from the oven. Remember, practice makes perfect!

Serving Suggestions for Homemade Crescent Rolls
When you find yourself with a batch of homemade crescent rolls, the possibilities for serving them are endless. Each time I bake these delightful rolls, I’m reminded of the countless ways they can elevate a meal.
Pairing with Soups and Salads
Imagine sinking your teeth into a warm, flaky crescent roll alongside a comforting bowl of chicken noodle soup. The buttery layers of the roll are perfect for soaking up every last drop of broth. Alternatively, serve these rolls with a fresh garden salad—their soft texture complements crunchy greens beautifully. Try stuffing your crescent rolls with a bit of herb-infused butter for an extra flavor kick!
Using as Sandwich Rolls
Have you ever thought about transforming your crescent rolls into unique sandwich creations? Slice them open and fill them with your favorite deli meats, cheeses, lettuce, and spreads. For a delightful twist, consider a breakfast sandwich with eggs and bacon tucked inside. These homemade crescent rolls add a touch of elegance to your everyday meals.
Enjoying with Your Favorite Spreads
Don’t forget about the joy of simply breaking open a warm crescent roll and spreading it with your favorite toppings. Whether it’s a smear of creamy butter, a dollop of fruit preserves, or even a savory cheese spread, the soft interior of these rolls embraces every flavor. They also make a lovely canvas for gourmet toppings if you’re hosting a brunch or a casual dinner party.
With these serving suggestions, your homemade crescent rolls will surely become a standout feature in any meal. Happy baking!
Time Breakdown for Homemade Crescent Rolls
Creating homemade crescent rolls is a delightful journey, one that fills your kitchen with warmth and tantalizing aromas. Knowing how to break down the time you’ll spend on this recipe can ease any concerns and help you plan accordingly.
Preparation Time
Getting started takes about 30 minutes. This includes gathering your ingredients, mixing your dough, and rolling it out. Enjoy the process—it’s where your crescent rolls begin to take shape!
Rising Time
Once your dough is ready, it requires some love with two rises totaling around 90 minutes. The first rise allows for the yeast to work its magic, making the dough fluffy. The second rise is crucial after shaping the rolls—this ensures a light and airy texture.
Baking Time
Now for the best part! Baking these beauties in the oven takes 12 to 15 minutes. You’ll want to watch for that golden brown color to know they’re perfectly done.
Total Time
In sum, you’re looking at about 2 hours and 15 minutes from start to finish. While that may sound like a bit of a time investment, the joy of pulling warm, flaky homemade crescent rolls from the oven is absolutely worth every minute!
Nutritional Facts for Homemade Crescent Rolls
Homemade crescent rolls are a delightful treat that can complement any meal. Enjoying these soft, flaky rolls doesn’t have to come with guilt—let’s break down their nutritional profile.
Calories per roll
Each homemade crescent roll typically contains around 110-130 calories. This makes them a perfect option for pairing with soups or enjoying as a snack without significantly impacting your daily caloric intake.
Macronutrient breakdown
When indulging in a homemade crescent roll, you can expect:
- Carbohydrates: Approximately 20-25 grams
- Protein: About 2-3 grams
- Fat: Roughly 4-7 grams
These rolls are primarily a source of carbohydrates, which offer quick energy, but are also balanced with some protein and fat to keep you satisfied.
Potential allergens
Always consider food allergies when baking. Homemade crescent rolls typically contain:
- Gluten (in flour)
- Dairy (from butter and milk)
- Eggs (if used in your recipe)
If you’re hosting guests, it’s wise to check with them about any dietary restrictions or allergies beforehand to ensure everyone can enjoy these delicious rolls.
FAQ about Homemade Crescent Rolls
Crafting homemade crescent rolls is a delightful journey, but it can come with a few questions along the way. Let’s tackle some common queries to help make your baking experience as smooth as the dough itself.
Can I make the dough ahead of time?
Absolutely! One of the best parts about homemade crescent rolls is their flexibility. You can prepare the dough in advance and let it rise in the refrigerator overnight. This not only saves time but also enhances the flavor as it ferments slightly, adding a depth you might not experience with fresh dough. Just remember to let it come to room temperature and complete its second rise before baking.
How should I store leftover rolls?
If you find yourself with leftover homemade crescent rolls (which can be tough to manage, but lovely to have!), store them in an airtight container at room temperature for up to two days. If you prefer them warm, a gentle reheat in the oven for about 5-10 minutes will revive their fluffy texture. For longer storage, consider freezing them!
Can I freeze unbaked rolls?
Yes, you can freeze unbaked rolls! Once you’ve shaped the homemade crescent rolls but before their final rise, place them on a baking sheet and freeze them until solid. After that, transfer them to a freezer bag or container. Bake straight from the freezer—just add a few extra minutes to the baking time. This is a great strategy for having fresh rolls ready at a moment’s notice.
Enjoy your baking adventure with homemade crescent rolls!
Conclusion on Homemade Crescent Rolls
In the journey of crafting the perfect homemade crescent rolls, you’ve explored the magic of transforming simple ingredients into a flaky, buttery delight. These rolls are not just an accompaniment; they can elevate any meal to a special occasion. Picture warm rolls straight from the oven, waiting to be shared with family and friends—what could be more inviting? Whether you’re a seasoned baker or just starting out, the joy of creating your own homemade crescent rolls will leave you with warm memories and a delicious reward. So why not give them a try and make your next gathering unforgettable?
Print
Crescent Rolls
- Total Time: 1 hour 32 minutes
- Yield: 24 rolls 1x
- Diet: Vegetarian
Description
Delicious homemade crescent rolls that are soft and buttery, perfect for any meal.
Ingredients
Scale
- 1 teaspoon instant yeast
- 1 cup warm milk (110–115°F (43–46°C))
- 1 tablespoon granulated sugar
- 3 ½ cups all-purpose flour
- 1 ½ teaspoons table salt
- 1 large egg
- 4 tablespoons unsalted butter, softened
- 1 egg (beaten with 1 teaspoon water or milk (for egg wash, optional))
Instructions
- In a large bowl, combine the yeast, warm milk, sugar, flour, salt, and egg. Mix and knead until a soft dough forms.
- Add the softened butter and continue kneading until smooth and elastic, about 6 to 8 minutes.
- Place the dough in a greased bowl.
- Cover with plastic wrap or a damp towel, and let rise in a warm spot until doubled in size, about 1 hour.
- Punch down the dough and divide into 2 equal portions. Roll each into a 12-inch (30 cm) circle.
- Cut each circle into 12 wedges using a pizza cutter or a sharp knife. Roll each wedge up from the wide end to the tip to form a crescent shape.
- Arrange rolls on a parchment-lined baking sheet, cover lightly, and let rise while preheating the oven.
- Preheat the oven to 375°F (190°C). Brush with egg wash if desired.
- Bake for 12 minutes, or until golden brown. Cool slightly before serving.
Notes
- For a sweeter roll, add a little more sugar to the dough.
- These rolls are best served warm.
- Store leftovers in an airtight container to maintain freshness.
- Prep Time: 20 minutes
- Cook Time: 12 minutes
- Category: Bread
- Method: Baking
- Cuisine: American
Nutrition
- Serving Size: 1 roll
- Calories: 120
- Sugar: 1g
- Sodium: 200mg
- Fat: 5g
- Saturated Fat: 3g
- Unsaturated Fat: 2g
- Trans Fat: 0g
- Carbohydrates: 15g
- Fiber: 1g
- Protein: 3g
- Cholesterol: 25mg